Get in touch with Yun-Sculpture company
Greek Temple Gazebo: Columns, Pediments & Garden Design

Garden architecture · Design guide
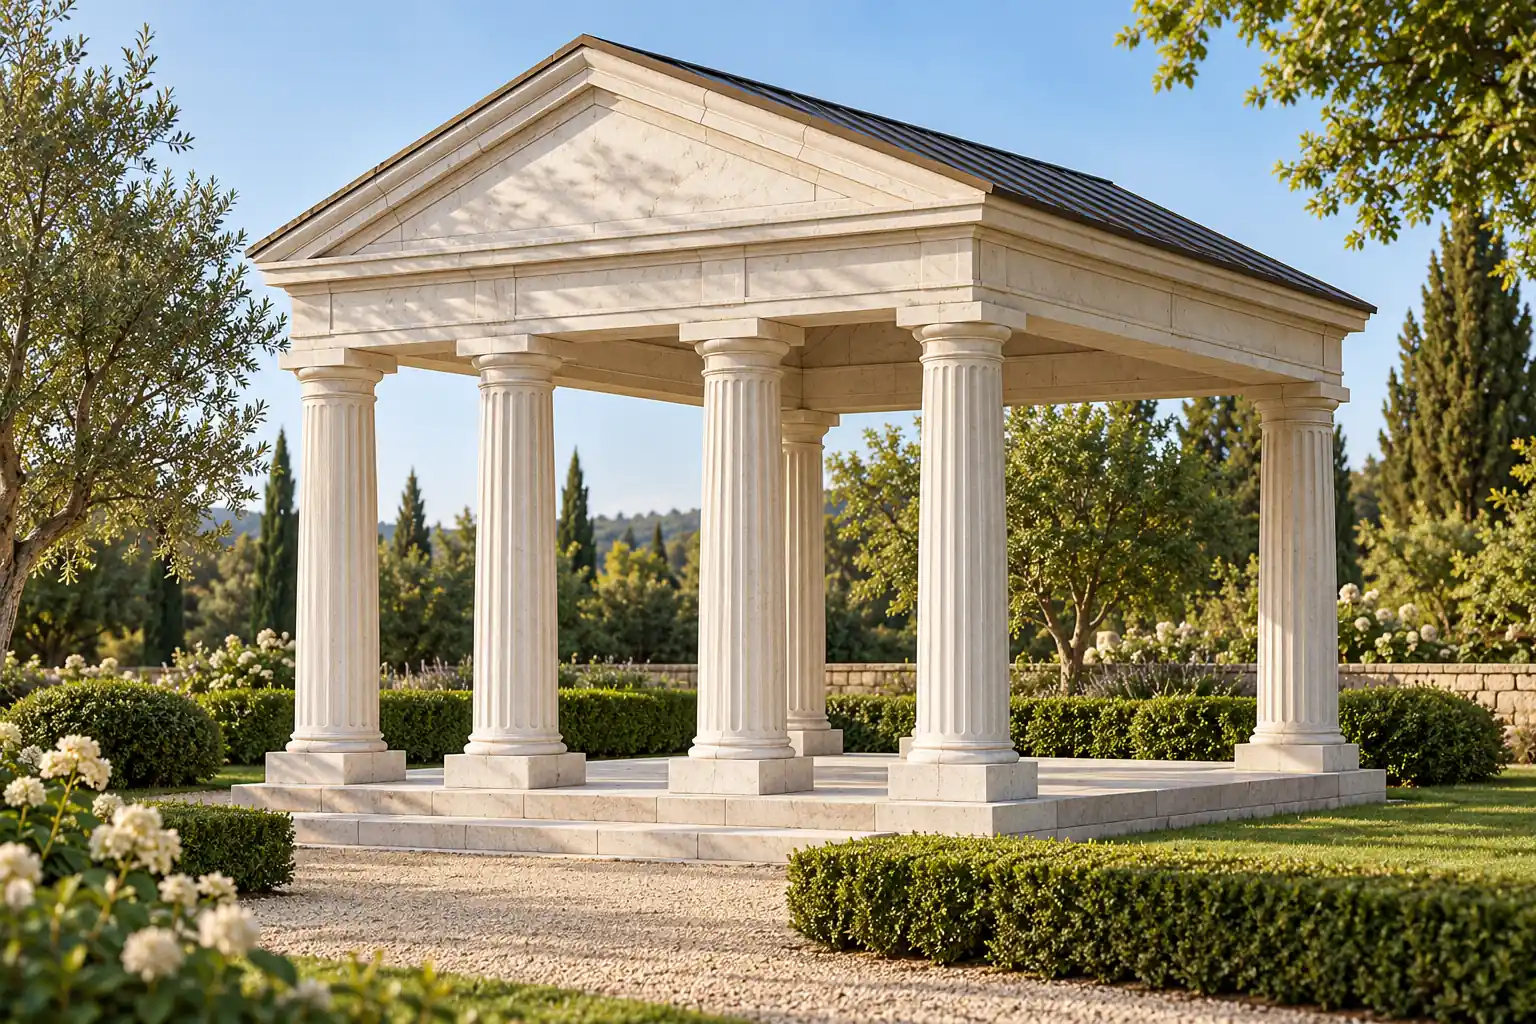
A Greek temple gazebo borrows the columns, strong horizontal lines and classical proportions associated with temple architecture. But the name alone does not tell you whether a photograph shows a pedimented pavilion, a circular colonnade or an ornamental dome. Start by separating the outline, the columns and the roof; then check what the proposed structure actually includes.
This guide helps you turn an attractive reference into a design brief that a maker and your local project team can discuss. For existing carved-stone designs, see Yun Sculpture’s marble and stone gazebo collection. A new temple-front arrangement still needs its own fabrication and supply assessment.
In this guide
- Temple front, round pavilion or dome?
- Read a real workshop photograph
- Parts of the temple front
- Choosing columns and carved details
- Greek Revival and new adaptations
- Stone appearance and the roof assembly
- Proportion, measurements and the entrance
- Joints, components and supplied items
- Your reference-image enquiry checklist
First choose the outline: a temple front or a circular pavilion
Look at the feature that made you save the picture. Is it a triangle above the entrance, a ring of columns, an elaborate capital or a dark metal crown? These can appear in different combinations. Calling the whole image “Greek” leaves too much for someone else to interpret.
| Design direction | Look for | Resolve before choosing details |
|---|---|---|
| Temple-front pavilion | A triangular pediment, horizontal entablature and columned front. | Which side faces the approach, and how the roof continues behind the front. |
| Circular classical gazebo | Columns following a round plan, with an open or covered top. | Entrance position, the view through the columns and the relationship between railing and seating. |
| Stone columns with an ornamental metal dome | Metal ribs or lattice above the stonework. | Whether there is any continuous covering, and what the dome contributes beyond its silhouette. |
Garden terminology is flexible. The National Trust’s Ascott summerhouse record describes a circular stone structure with an open iron dome, while a photograph reference calls it a Greek temple/gazebo. That is a useful reminder that the label is less precise than a plan and elevations.
The Metropolitan Museum of Art describes the typical ancient Greek temple as oblong in plan. This does not mean a circular garden structure is an unsuitable classical design. It means that a round pavilion and a pedimented temple front should be compared as different visual directions, rather than assumed to be interchangeable copies of one building type.
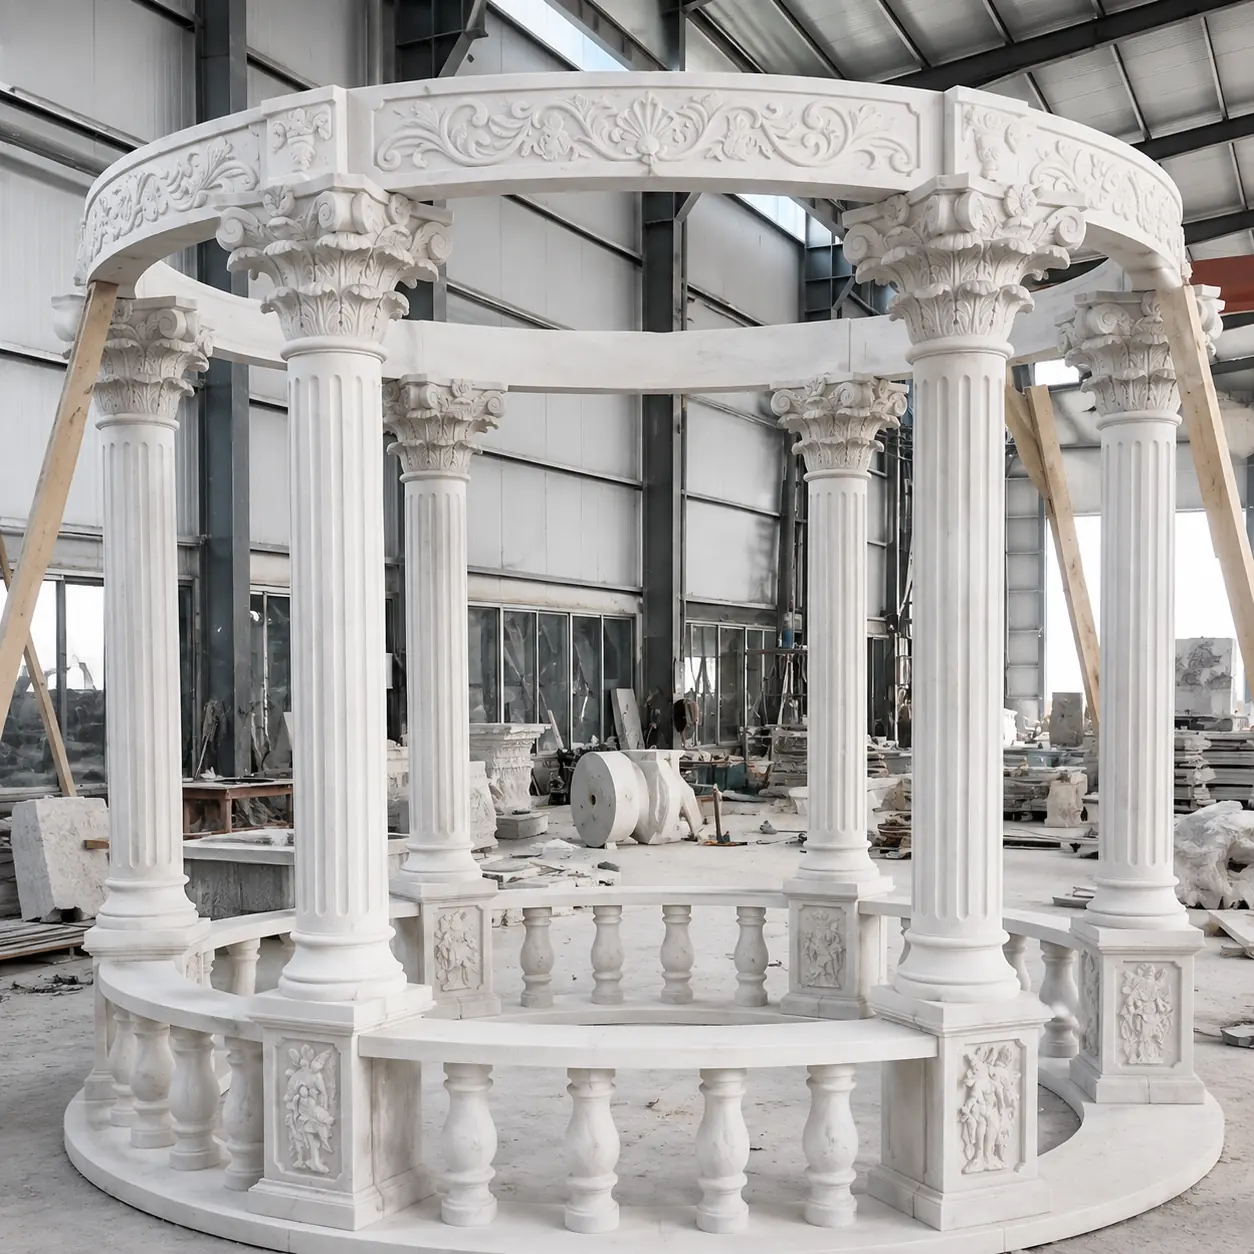
Read this workshop photograph in four passes
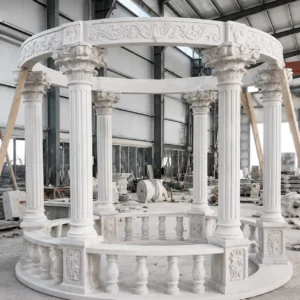
1. Start with the outline. The columns and curved upper ring describe a circular, open-top structure. The sky-facing center is open; there is no triangular pediment in this view. This is a useful reference if you value a ring of carved stone framing the garden. If the triangle is your priority, borrow a detail from this image rather than treating the entire design as a temple-front reference.
2. Follow the capital into the upper band. Leaf-like carving spreads outward above the fluted shaft, meeting a wide, decorated ring. The relief has broad raised forms and recessed areas that catch light and shadow. Compare the visible width of that capital with the shaft below it: this transition contributes to the weight of the upper outline. A client can borrow the fluting, the foliage or the framed scroll panels independently; choosing all three is a separate aesthetic decision.
3. Read the railing before imagining the entrance. A curved balustrade runs across the facing arc between projecting pedestals. It gives the lower outline an enclosed, furnished character, but this angle does not clearly identify the intended entrance. For a seated garden setting, that boundary may be attractive. For an approach that must stay visually open, compare a version with the approach bay left free. A plan should identify that bay and its clear gap between the widest base projections.
4. Look for divisions and repeated motifs. Vertical divisions are visible in the upper ring near supports; the carving is organized in framed sections. The lower pedestals also carry framed relief panels. This lets you compare a design whose ornament finishes neatly within each piece with one that requires a pattern to continue across a join. Ask to see the proposed seam and motif rhythm together on the elevation. The photograph demonstrates carved components brought together in a workshop; hidden fixings and dimensions come from the corresponding drawings, not this view.
Make the first decision explicit: “I want the triangular temple front,” or “I want the circular arrangement and a view of the sky.” Once that is settled, column detail becomes a more manageable choice.
What are the parts of a Greek temple called?
You do not need a long architectural vocabulary to discuss a garden pavilion. A few names let you point to the exact part you want to change. The Acropolis Restoration Service explains the horizontal elements and pediment as separate parts; the diagram below follows that distinction.
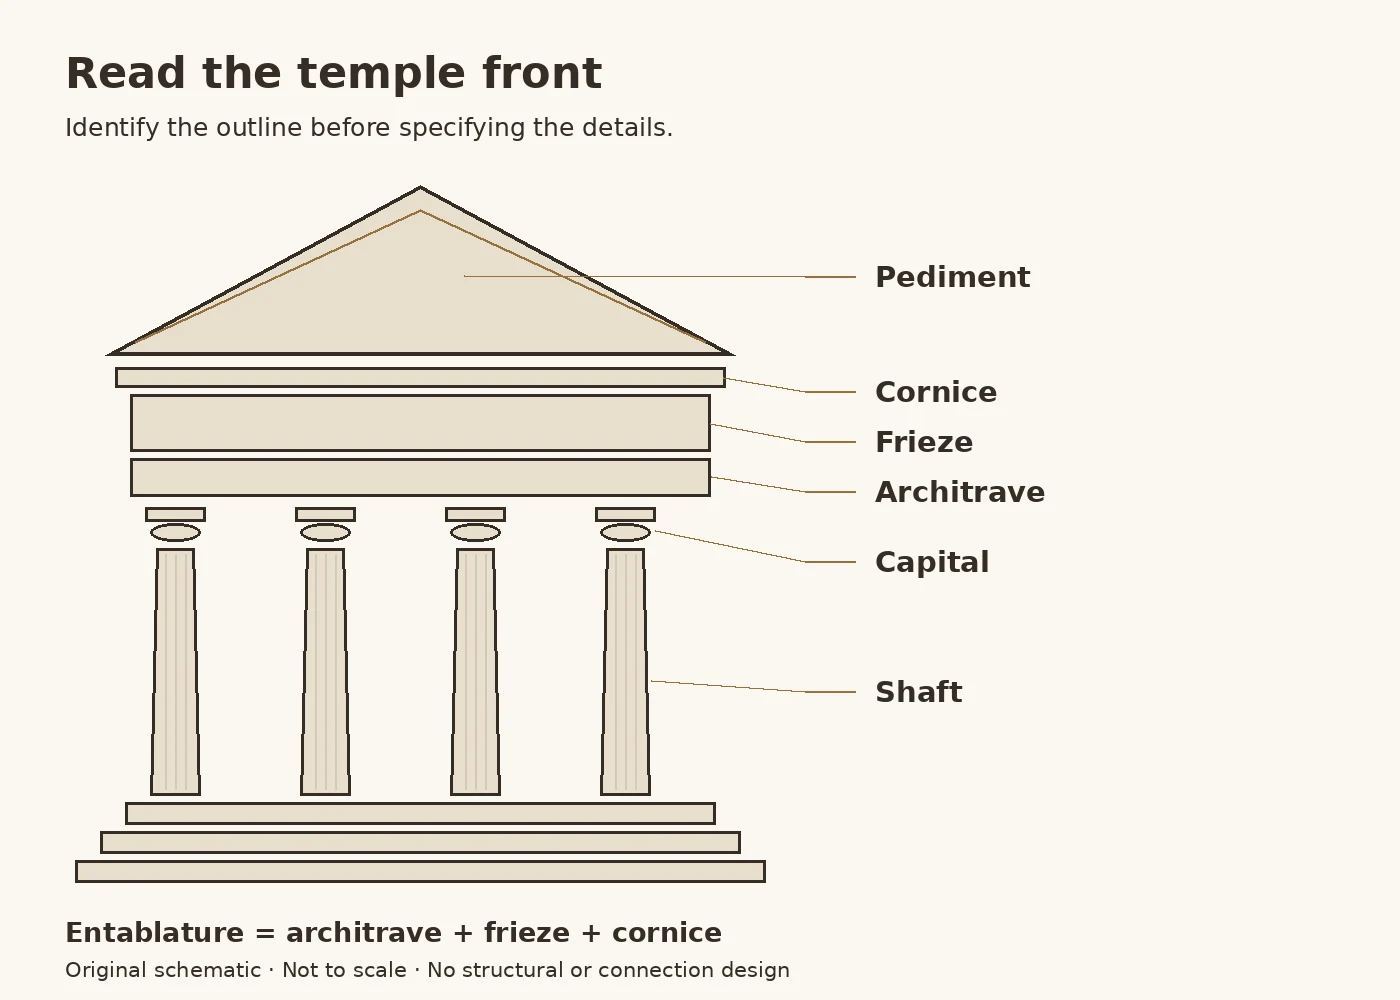
- Column shaft and capital
- The shaft is the upright column body. The capital is its shaped top, where the upright meets the horizontal assembly.
- Entablature
- The horizontal assembly above the columns: architrave, frieze and cornice.
- Architrave
- The lowest principal band of the entablature, directly above the capitals.
- Frieze
- The band above the architrave, which may be plain or decorated.
- Cornice
- The projecting upper molding that defines the top edge of the entablature.
- Pediment
- The triangular area formed at a gabled temple end above the horizontal cornice. It is not the entire roof.
What is a Greek pediment—and what does it leave unanswered?
The pediment provides the recognizable triangle at the front. Read its slope and edge profile first, then use a side elevation to follow the roof behind it. That separates a front feature from the continuous covering needed for rain shelter.
For a new design, identify whether you like the triangle’s pitch, its projecting edge or its decoration. These are separate requests. A plain triangular field preserves the outline without adding sculpture. Relief decoration puts more visual activity above the columns; compare a plain and a decorated elevation before commissioning a detailed carving drawing.
Choose the column order before adding more ornament
The Acropolis Restoration Service’s column guide distinguishes Doric, Ionic and Corinthian through their capitals, bases and other elements. For a first reading, recognize the curved cushion and square slab of Doric, the paired scroll volutes of Ionic, and the acanthus-leaf ornament of Corinthian. Classical Greek Doric has no distinct column base; later garden adaptations may combine features.
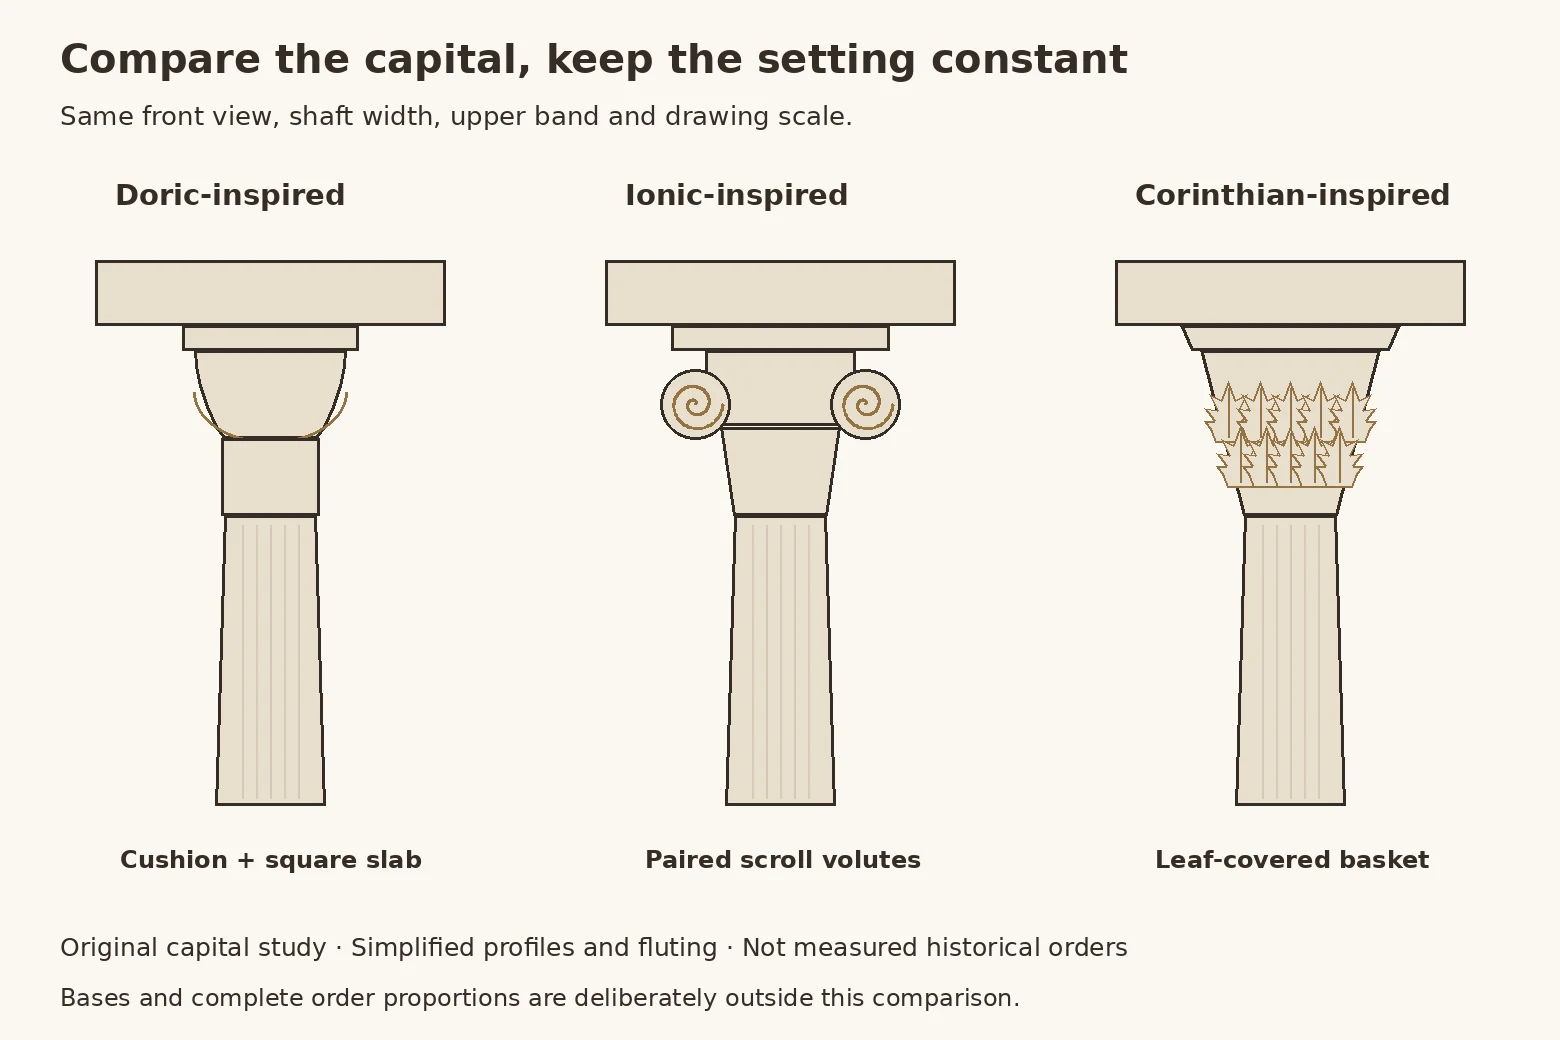
The study keeps the front view, shaft width and upper band constant so you can compare the capital itself. It deliberately simplifies profiles and fluting rather than presenting measured historical orders. Historical accuracy requires a complete reference, including the base and entablature; here the purpose is to help you choose a visual direction.
| Direction | What you can see | A design preference to explore |
|---|---|---|
| Doric-inspired | A compact transition, curved cushion and square top, with little leaf or scroll detail. | Start here if you want the triangle, column spacing and clean outline to lead. Compare with a plain frieze before adding ornament elsewhere. |
| Ionic-inspired | Paired scrolls spread sideways above the shaft and create a distinct horizontal accent. | Explore this if you want a recognizable decorative capital without a full basket of foliage. Compare its side view too: a frontal scroll drawing does not explain every corner. |
| Corinthian-inspired | A leaf-covered basket makes a more layered transition between shaft and upper band. | Explore this if near views of carving are part of the attraction. Compare restrained and decorated friezes so the capital has room to remain legible. |
These are starting preferences, not rules that one order belongs to a certain garden, budget or customer. A simple capital can sit beneath an elaborate pediment, and a leafy one can be paired with a plain upper band. Evaluate the combination you actually want.
Use distance to decide where the detail earns its place
First reduce the elevation to a small image: look at the triangle, the repeated uprights and the darkness of the band above them. Then enlarge the entrance view to examine scroll edges, leaf relief, flute endings and the underside of the beam. This two-distance exercise helps separate a silhouette you enjoy from ornament that will mostly be appreciated up close.
Balance the shaft, capital and upper band together
Ask for two versions of the same elevation. Keep the roof, span and shaft height fixed while changing only the capital option. A broad capital over a slim shaft can make the transition appear more emphatic; a deep upper band can make that whole junction read as heavier. If the result feels crowded, try a narrower capital or quieter frieze before changing several features at once. This is an aesthetic comparison, not a structural ratio.
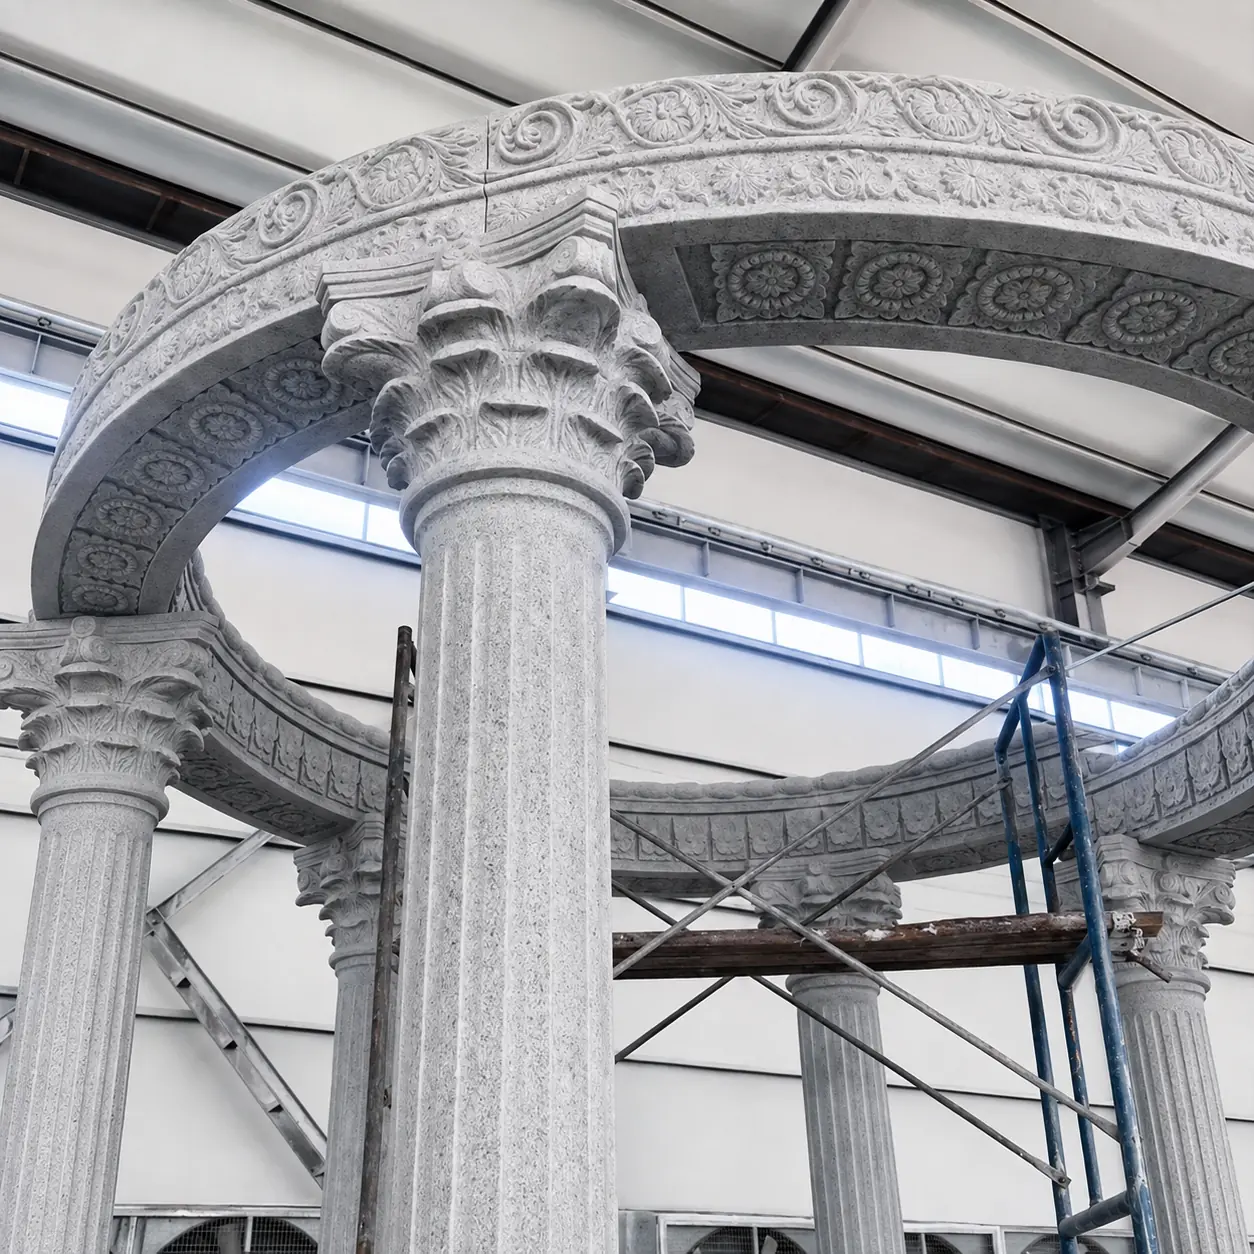
In the close-up above, the leaf carving, fluting and decorated underside are all visible. Use it to discuss relief character and how much detail you want at eye level. It belongs to a different workshop assembly from the white circular example, so the two photographs are separate craft references.
Keep figure columns a separate design decision
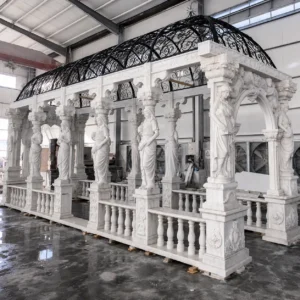
Female figure supports, often called caryatids, make sculpture part of the pavilion’s appearance. Compare the complete figure and the transition above its head with ordinary columns, rather than choosing only a face or dress detail.
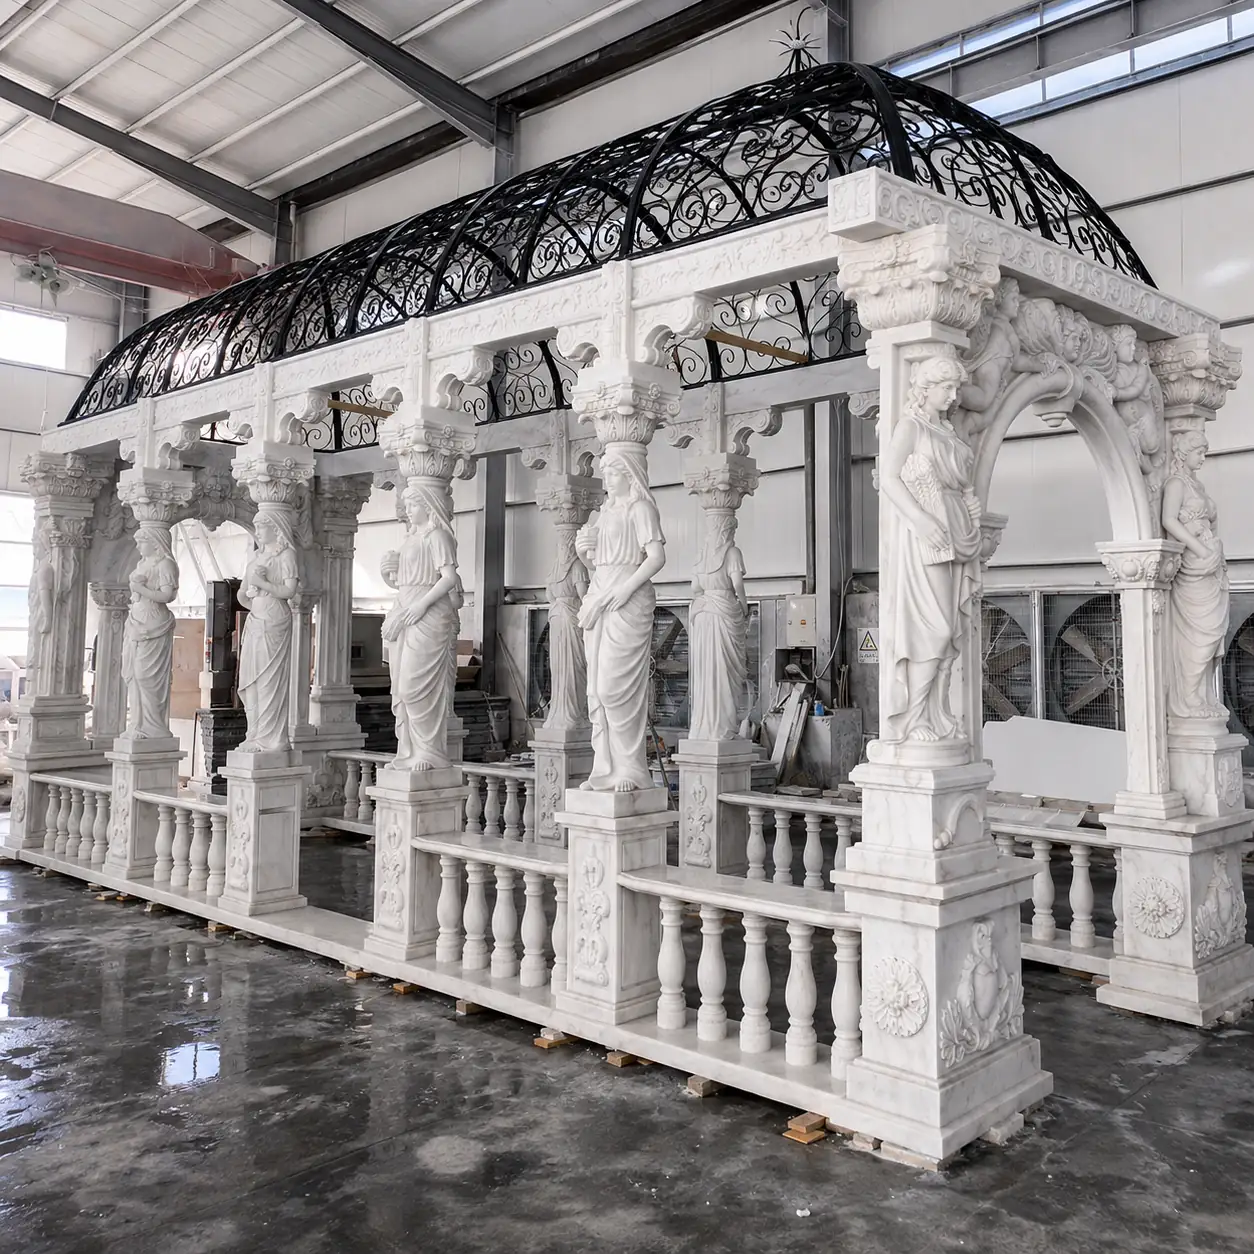
The rectangular assembly shows a repeated sequence of figures, framed panels and an open ornamental canopy. Borrow a carving treatment or a repeating rhythm if it appeals to you; its rectangular outline and curved metal crown remain a different design from a pedimented front.
What does “Greek Revival temple gazebo” mean?
Greek Revival names a later revival of ancient Greek forms. The U.S. National Park Service describes its popularity in America during the 1830s–1860s and highlights columned entrances and pronounced triangular roofs. A newly made Greek Revival temple gazebo can draw on that language; the name does not establish the object’s age.
Decide whether your reference is a historical model to follow closely or simply a mood to reinterpret. A house with a strong temple-front porch may call for related proportions. A freestanding garden feature may allow a simpler adaptation. Ask to see both the front and side beside a photograph of the surrounding building, so the relationship can be judged.
Keep an aged appearance separate from antique provenance. Warm color, softened-looking edges or a picturesque garden background cannot prove age. For new work, describe the intended surface color and finish explicitly, with a sample reference.
A second temple-front direction: quieter shafts, scroll capitals
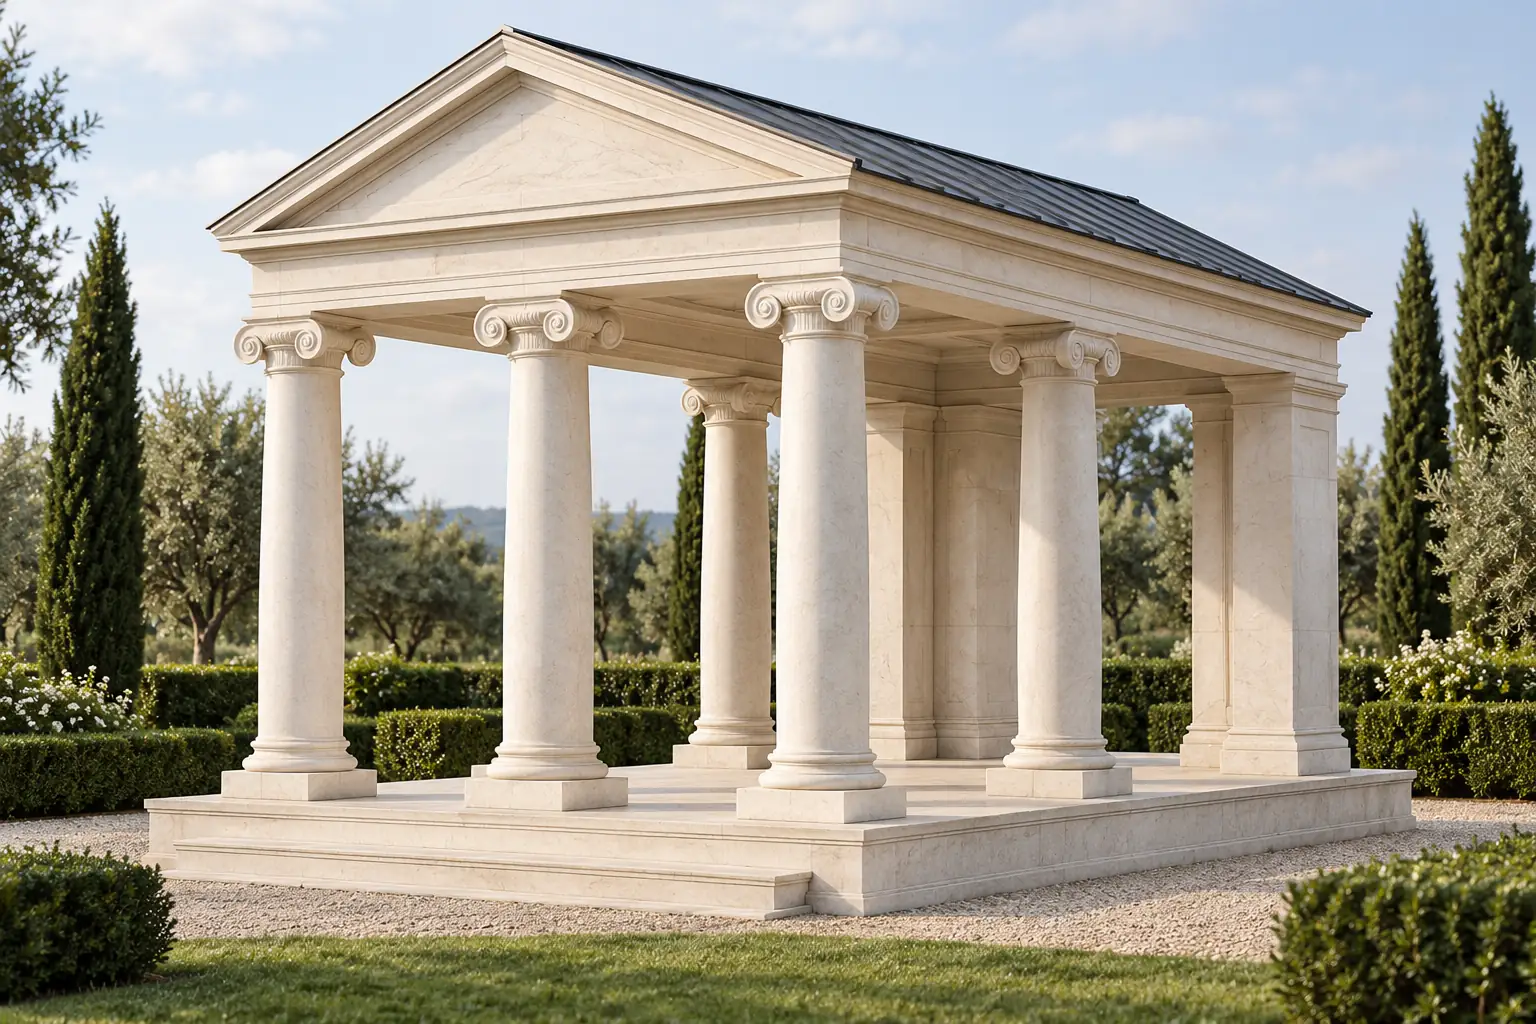
This separate concept explores smooth shafts and simplified Ionic-inspired capitals beneath a plain pediment and horizontal bands. Compared with the fluted first concept, more of the surface reads as broad stone planes. Its visible rear wall sections also give the interior a more enclosed background. You can prefer the column treatment while still asking for a more open rear arrangement; those choices need not travel together. This is a different concept, not a second view of the first design or a controlled one-variable comparison.
Separate the stone appearance from the roof assembly
Compare two layers of the proposal: the visible material and the roof assembly behind its outline. Pale carved stone, manufactured cast stone and a stone-colored covering can share a color while requiring different specifications.
Natural stone: ask what the sample represents
For a carved-stone proposal, request the stone name, finish and current sample photographs. Ask which visible components the sample represents. A small polished sample helps discuss color, but does not show how a long beam, a fluted shaft and a relief panel will look together.
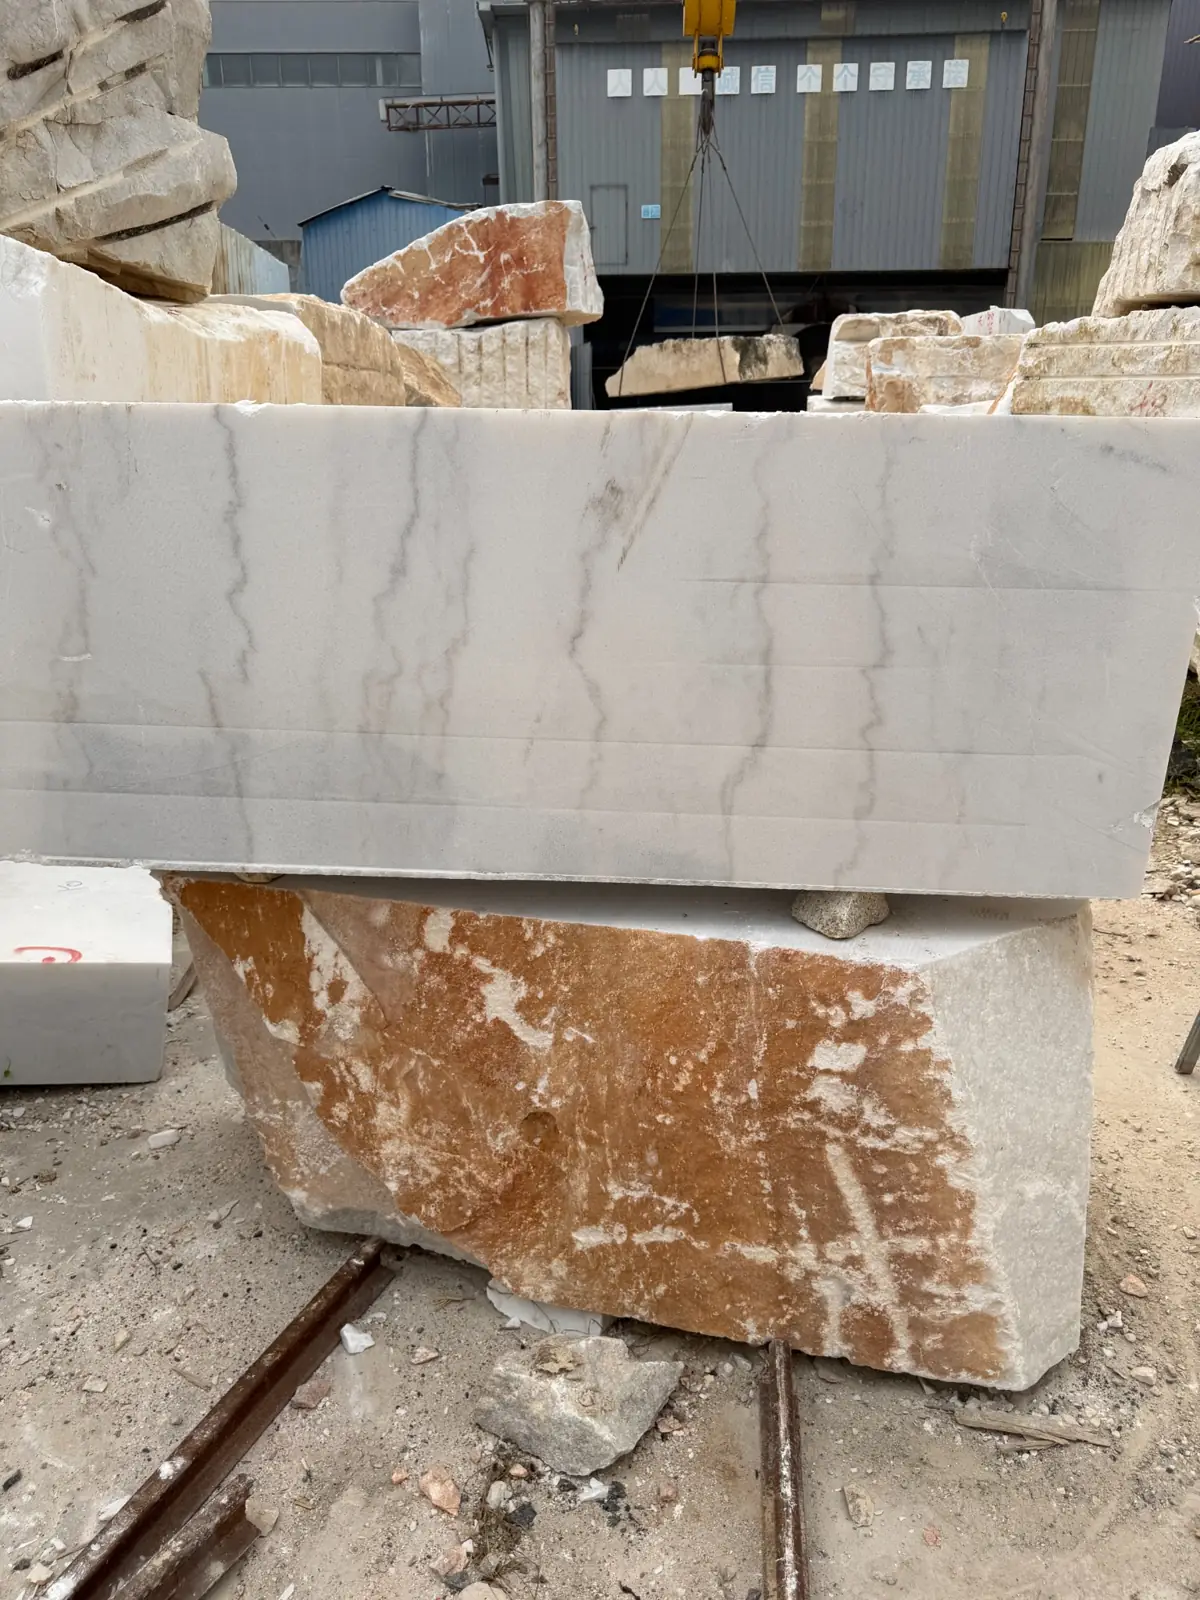
The material-yard photograph lets you discuss a pale background crossed by gray veins. Compare that character with the quieter surfaces of the design concepts: would you prefer the natural pattern to be noticeable, or to sit behind the carving? The exact stone name and the batch for an order belong in the material selection; this block is a separate reference, not a matched component from the pictured gazebos.
Review light and finish consistently: a damp block, a sunlit polished surface and a dry workshop piece can look different. Ask for comparable photographs or a physical sample when appearance is critical. Record the accepted finish separately from the color description.
Cast stone: compare a documented system
The Cast Stone Institute defines cast stone as a manufactured architectural concrete unit made to resemble natural cut stone. If another proposal uses it, compare that supplier’s sample, component documentation and intended support arrangement. A shared white appearance is not enough to establish equivalent construction or maintenance needs.
Cast stone is included here to help compare market alternatives; it is not an additional Yun Sculpture supply claim. Keep the broader material comparison separate from choosing the architectural form.
A decorative dome is not a continuous roof
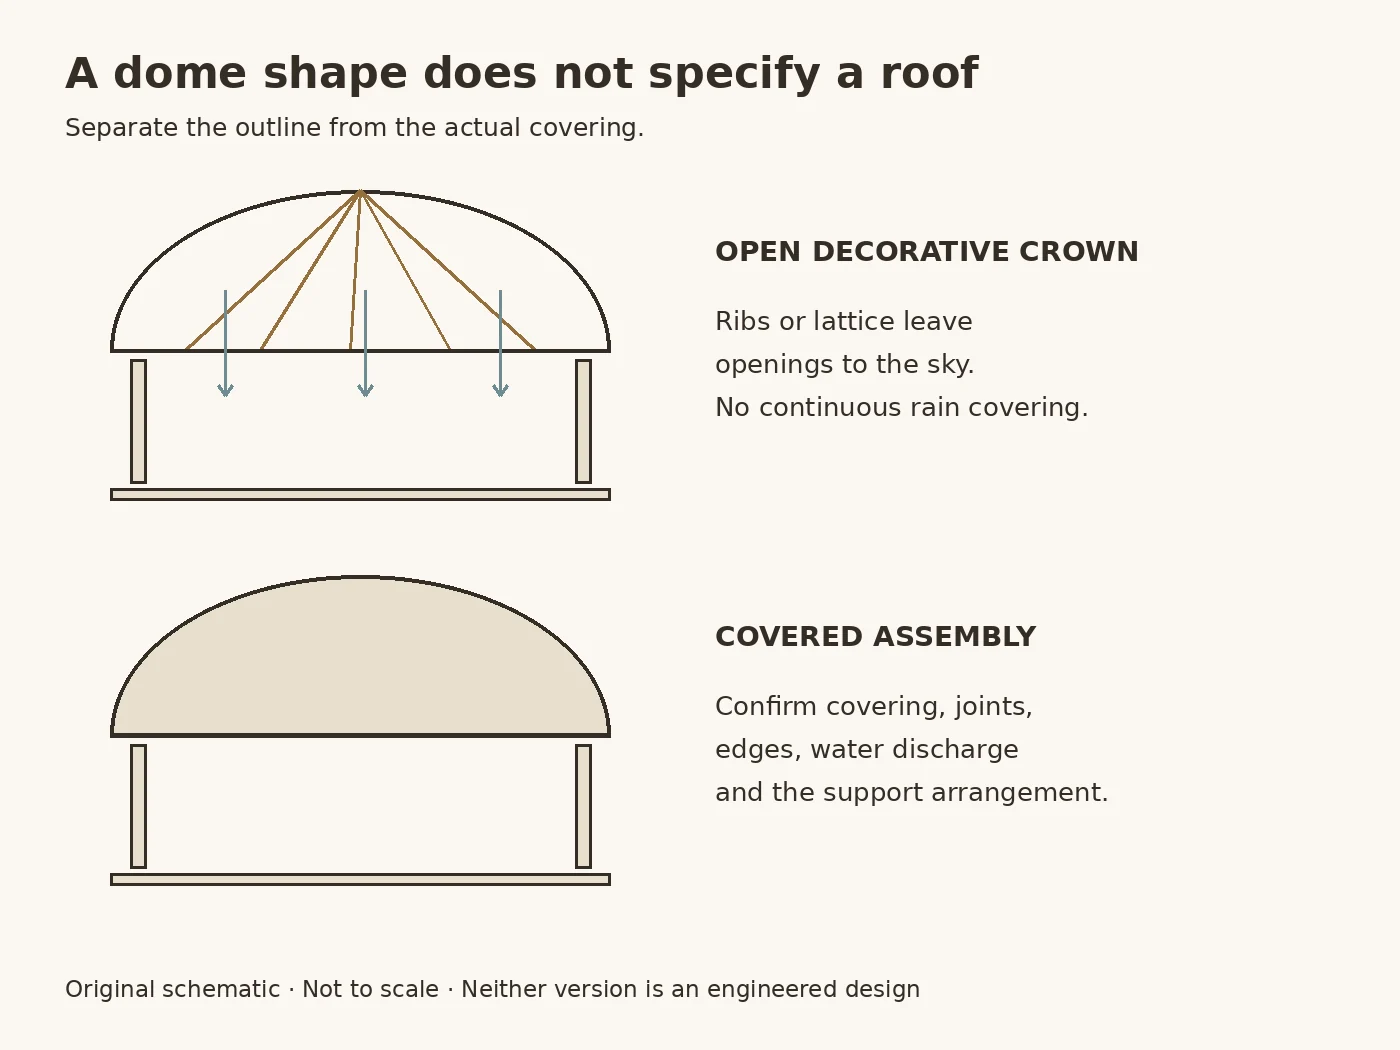
Open ribs or lattice frame the sky and contribute a silhouette. Without a continuous covering, they leave openings for rain. A covered roof needs a defined covering, joints, edges and water-discharge arrangement. Look at these edges and underside details alongside the exterior outline.
Compare an underside view with the exterior: visible supports can change the interior character, while edge details determine where water is intended to leave the roof. Choose the appearance and coverage objective together. A change from an open crown to a covered roof must also enter the project’s support and drainage review.
If you are comparing stone with an iron-only or enclosed glass structure, the gazebo and pavilion collections provide the appropriate commercial starting points. This guide stays with the classical design brief.
Check proportion, the entrance and the space between columns
A useful plan distinguishes the outer roof envelope, platform edge, support centerlines and clear gaps. “Overall width” could refer to any of the first three. Ask for the line that answers your question: the widest roof dimension for the exterior envelope, the platform dimension for the floor footprint, or the gap between projecting bases for the entrance.
Worked comparison: the same platform, two different priorities
Hypothetical example. The following dimensions are chosen only to demonstrate geometry. They are not a Yun product size, recommended access width or engineering approval. The plans illustrate the floor arrangement, not a roof or support design.
Keep a rectangular platform at 6.00 × 4.80 m (approximately 19.69 × 15.75 ft). Both options use four 0.40 m square bases, the same rear-base positions and side/rear rail lines. The front bases move outward in B, and the benches move from the sides to the rear. A 1.20 m diameter table outline stays at the same location in both.
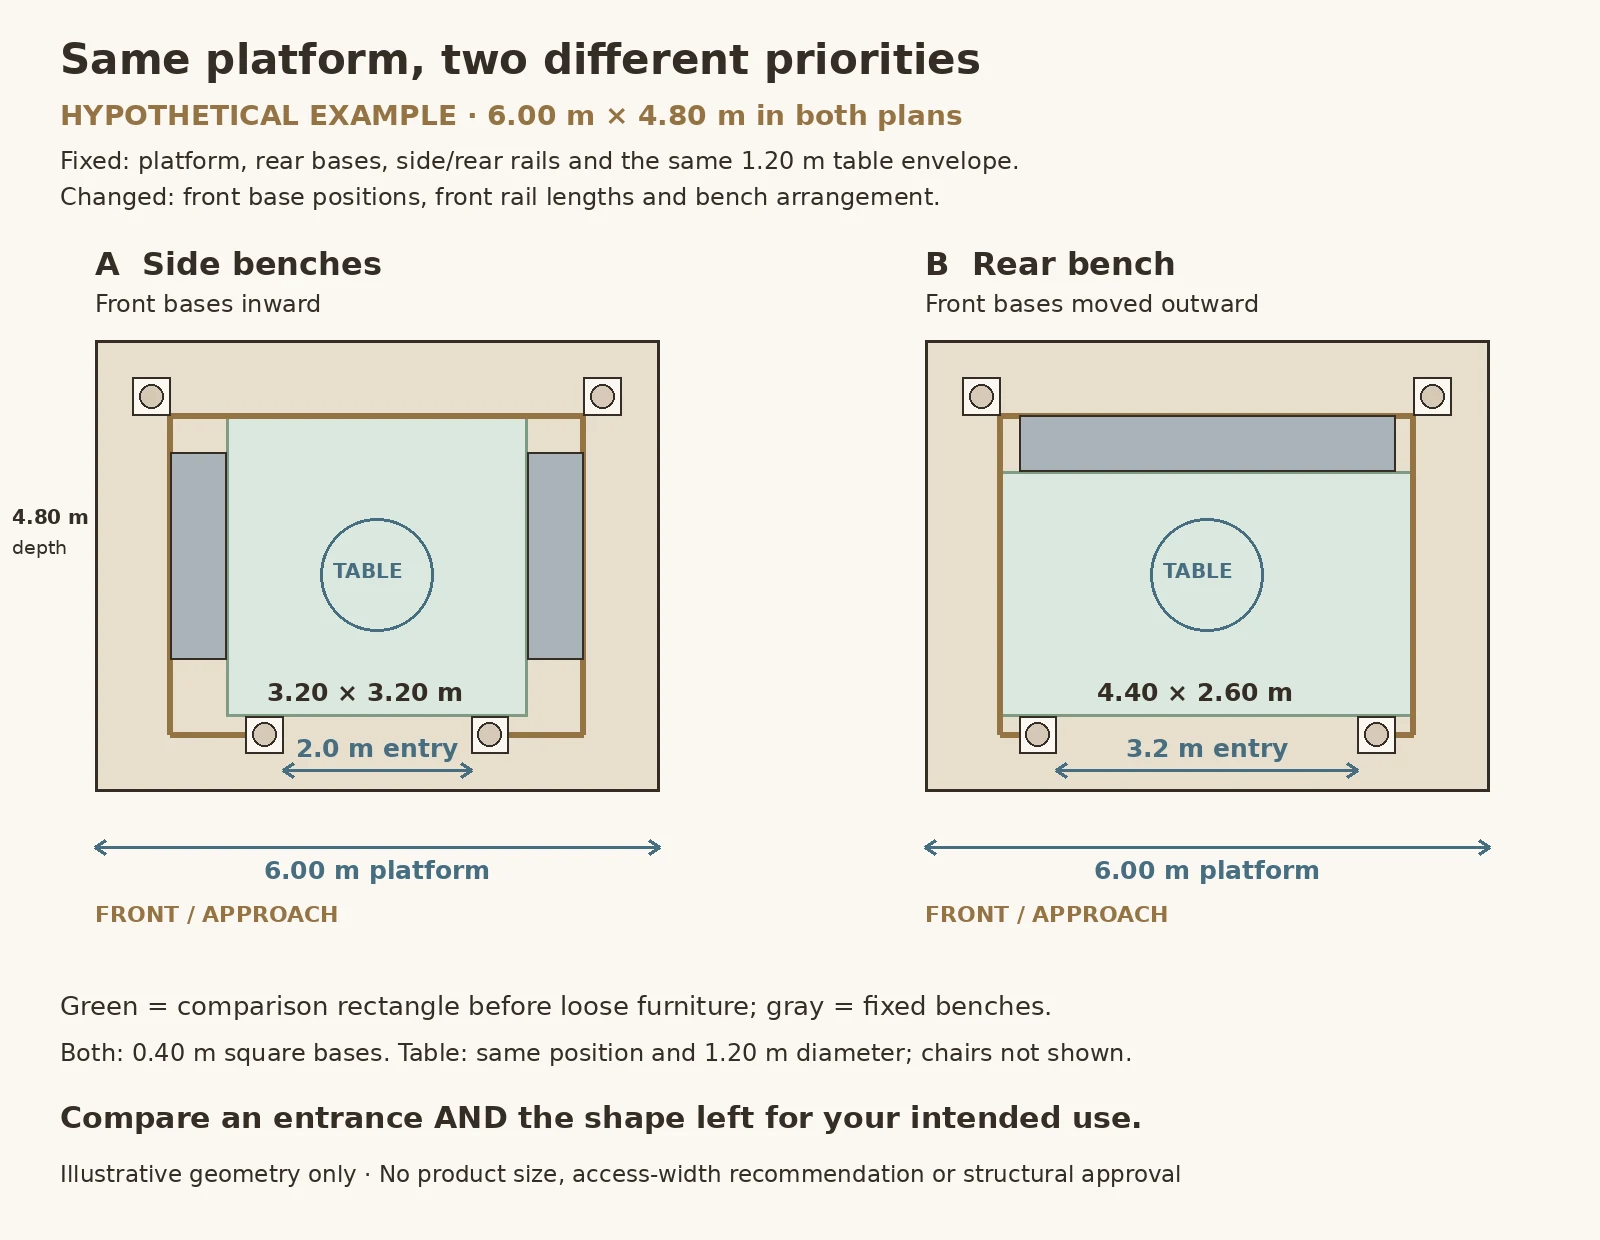
| Compare | A: side benches | B: rear bench |
|---|---|---|
| Platform, unchanged | 6.00 × 4.80 m | 6.00 × 4.80 m |
| Front-base center spacing | 2.40 m | 3.60 m |
| Entry between base faces | 2.40 − 0.40 = 2.00 m | 3.60 − 0.40 = 3.20 m |
| Bench arrangement | Two side benches, each 2.20 m long × 0.60 m deep | One rear bench, 4.00 m long × 0.60 m deep |
| Green comparison rectangle, before loose furniture | 3.20 × 3.20 m = 10.24 m² | 4.40 × 2.60 m = 11.44 m² |
Read the entry first. With equal base widths, moving the front centers apart increases the clear opening by the same 1.20 m. For a frontal group view or a wider-looking approach, that makes B worth comparing. The platform itself has not grown; the entrance change comes from the supports and the corresponding front rail lengths.
Then read the shape of the center. A’s side benches leave a narrower, more nearly square comparison rectangle. B removes those side benches and creates a wider rectangle, but its rear bench reduces the depth. The green areas are deliberately defined rectangles for comparison, not claims about the maximum usable area or how many people fit.
Finally, place the same furniture. The table has the same center and diameter in both drawings. In A, the horizontal gap from its side edge to each bench’s inner edge is 1.00 m. In B, the table’s rear edge is only 0.50 m from the rear bench’s front edge. These are edge-to-edge geometric gaps, not approved movement clearances. Adding people, chair pull-out or a different table shape changes the arrangement. A wider entry alone does not create an unobstructed route past a table on the approach axis.
Choose the comparison that fits the use. For a ceremony or a frontal photograph, begin with the entry frame and the clear standing area; compare the drawings without the table as well. For conversation around a table, begin with the seating-to-table relationship and occupied furniture space. For a lounge arrangement, compare depth and furniture outlines before ranking the two green areas by square metres. B’s larger number is not a universal winner.
Bring that comparison back to the site
View the proposed front from the path and from the house; the pediment may face one while appearing mostly side-on from the other. Mark support and furniture positions on the ground to test the visual arrangement. Full furniture layout belongs in the project plan; here the lesson is to compare the right measurement lines before choosing the classical frame.
Read the seam rhythm, then agree on the supplied parts
Follow each horizontal band across the elevation. Does a repeated leaf, scroll or framed panel finish before a joint, or continue across it? A seam at the edge of a framed panel can read as part of the rhythm. A seam through a continuous motif puts more emphasis on alignment. Neither is automatically wrong; choose the appearance you want to review.
Next compare the divisions with the supports. A sequence of panels that relates clearly to the columns can make the upper ring feel orderly; a different arrangement may suit a more continuous ornamental band. Use an elevation with proposed component divisions to compare these effects. For a pediment, look at the triangular face pieces and sloping moldings together rather than approving only the front silhouette.
These visible choices are useful before the fabrication details are final. Hidden fixings and the suitability of each component split require the actual assembly design. A workshop fit-up photograph records the visible parts brought together at that stage, not the hidden connection specification.
Keep the project confirmations in one place. Match the written supply list to the drawing: stonework, roof, railing, platform, steps, seating and ornament should each be marked included, optional or provided locally. Confirm the selected material, component sizes and connections, roof covering/drainage, and the local design requirements for that configuration. Shipping, unloading, lifting, foundations and installation are separate scope items. Neither a concept image nor the hypothetical floor comparison supplies an engineering rating.
Turn reference images into a useful design brief
Choose one principal image and mark the features you want to retain. If you combine references, label each contribution: the front silhouette from A, the capital from B and the stone finish from C. List what may change. An AI image can serve as one of these references; identify its priorities so the proposed model can translate them into the chosen materials and components. This gives the designer a hierarchy rather than a pile of competing pictures.
| Send | Explain |
|---|---|
| Main reference and priorities | Temple front or round plan; preferred column and roof. Identify any detail you do not want. |
| Approximate size and use | Length × width or diameter, what the measurement describes, intended seating or gathering use, and the main entry direction. |
| Roof objective | Open decoration or a requirement for coverage. Include a side or underside reference if available. |
| Stone and finish direction | Preferred appearance and sample requirements; separate carved components from metalwork. |
| Site and destination | Site photographs, delivery country and postcode, and known access restrictions. |
| Local project information | Existing drawings and requirements already supplied by your architect, engineer or installer. Note unresolved items. |
When comparing proposals, use the same written scope. One may include railings and steps while another includes only columns and the upper frame. A lower headline price cannot be assessed until the supplied components, drawings, packing and delivery scope are aligned. Detailed specifications and quotations belong with the commercial page and project review.
Greek temple gazebo questions, answered briefly
How is a temple front different from a round classical gazebo?
A temple front emphasizes a columned elevation and triangular pediment; a round gazebo organizes its columns around a circular plan. Compare the outline before selecting decoration. See the outline comparison.
Does a triangular pediment mean the pavilion has a rain roof?
No. The pediment describes the front feature. Follow the side view to the covering behind it, then examine the roof edges and water-discharge arrangement. Compare open and covered roofs.
How should I choose between a simple and a leafy capital?
Compare both on the same elevation, keeping the shaft and roof constant. Decide whether you prefer the overall outline to lead or want more close-up carving; then check the capital width against the shaft and upper band. Use the capital study.
Which dimensions should I compare first?
Separate roof envelope, platform, support centerlines and the clear entry between the widest base projections. Then compare the space left for the intended use. Follow the hypothetical two-plan example.