Get in touch with Yun-Sculpture company
Orangery Roof Options: Lanterns, Glass & Solid Perimeters

Garden rooms · Roof form, light and making
Want a room-like ceiling with a view of the sky? Compare a solid roof perimeter with a raised glazed lantern.
Want a quieter, lower roofline? Compare an insulated roof with a lower-profile rooflight.
Want glass overhead across most of the room? Compare a glazed roof, with shading and climate control included in the brief.
An orangery roof shapes two views at once: the silhouette seen from the garden and the ceiling experienced from your chair. The useful choice is how much roof should feel solid, where the sky should appear, and how the frame will divide that view.
For the structure around it, see Yun Sculpture’s iron greenhouses and conservatories collection. This guide concentrates on the roof decisions that turn a reference picture into a clearer design brief.

In this guide
What does an orangery roof look like?
In much contemporary extension design, the familiar arrangement is an opaque roof around the edges with a glazed lantern rising above the center. A lantern has its own raised form; a lower rooflight introduces overhead glazing with less emphasis on a raised crown. A largely glazed pitched or curved roof creates another experience, with framing and sky extending across more of the ceiling.
These are useful descriptions for comparing drawings. Historically, the name was broader: the National Gallery of Art’s landscape history project documents overlapping uses of orangery, greenhouse and conservatory for plant-keeping buildings. Describe the actual roof arrangement rather than treating the name as a specification.
Solid perimeter + lantern
A raised glazed center
Solid roof + rooflight
A lower glazed opening
Mostly glazed roof
Glass across most of the slope
| Arrangement | What it contributes | The choice it creates |
|---|---|---|
| Solid perimeter + raised lantern | A defined ceiling edge and a raised opening to the sky. | Balance the lantern against the visible roof band, furniture and exterior cornice. |
| Insulated roof + lower rooflight | A less prominent glazed opening within a more continuous roof. | Compare the view from inside, not just the discreet exterior profile. |
| Mostly glazed pitched or curved roof | A stronger connection to the overhead frame and sky across the room. | Compare glass area, bar density, glare, shading and heating/cooling together. |
An opaque perimeter can make space for an insulated roof build-up and a ceiling service zone. A decorative fascia or internal pelmet alone does not tell you how much roof is actually solid. Ask to see the roof plan and section: the opaque area, opening and framing should be distinguishable.

In the dark glasshouse reference, the sloping glazed roof is visible above a broad fascia. The fascia gives the edge architectural weight; the roof above still reads as glass. This is a useful comparison if you like a substantial outline but want to retain a largely glazed ceiling.
Place the roof opening around the room below
Start with a simple furniture plan. Mark the table, seating, doors and the part of the garden you want to look toward. Then draw the overhead opening on the same plan. A roof centered on the building is one option; an opening related to a particular activity is another.
For a dining room, a lantern can give the table a clear place within the composition. For a sitting room, consider where people face and whether bright overhead glazing enters that view. For plants, record where the growing benches will stand and which plants you intend to keep; a plant brief and a human-comfort brief may call for different environmental choices.
A · Opening centered on the room
B · Opening shifted toward dining
In A, the opening sits between the sofa and table, overlapping part of the table. It gives the ceiling a centered composition, even though the furniture is not symmetrical. In B, the same opening moves toward the dining area, extending the opaque roof zone around the sofa. The floor area and circulation have not changed; the relationship between the activities and the sky has.
If the table is the main occasion, compare B first. If a centered ceiling and a shared overhead view matter more, compare A. Before choosing between them, look at a section from seated eye level and a sun/shade study for the intended hours. Moving an opening does not, by itself, establish where direct sunlight will fall.
Lantern size is a second decision. Enlarging it changes the balance of opaque roof and glazing, as well as the framing and maintenance problem. Start with the desired experience and ask the designer to show the resulting composition; a fixed percentage of floor area is a poor substitute for that comparison.
Choose the roofline before adding ornament
From the garden, compare the eaves line, the main roof shape and the highest feature. A low perimeter with a distinct lantern creates a layered profile. A continuous pitched roof reads as a simpler whole. A curved roof softens the silhouette but also asks the glazing layout to follow a different geometry.
Compare these forms from the approach and from an upper-floor window if there is one. A roof that appears delicate at ground level can look much busier from above, where every glazing bar is visible. For an attached structure, include the existing windows, eaves and wall in the elevation rather than assessing the garden room in isolation.
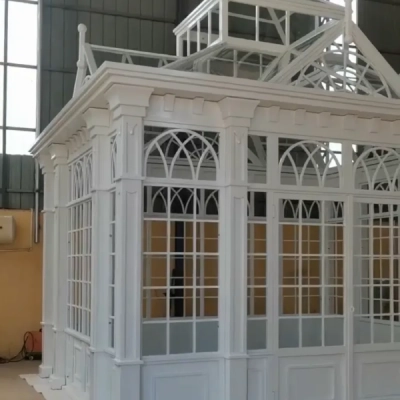
In the white workshop frame, arched wall openings sit beneath pitched roof bars and a raised central feature. Trace the large shapes first. Then notice the smaller fan-shaped divisions: repeated decorative lines make the transition from wall to roof more elaborate. The pale finish helps those details stand apart from the workshop background.
Roof bars and decorative bars do different jobs
Distinguish the lines dividing the glazing from ornament placed within or beside them. For appearance, compare the uninterrupted view between the main bars. Then decide where scrolls, leaves or crests add character without competing with it. Their exact construction role belongs in the drawings.

The green detail shows that difference clearly: a broad frame encloses a curved bar and smaller leafwork. You can borrow the balance of plain edges and concentrated ornament without copying every decorative piece across the whole roof. A close-up helps choose detail; a distant elevation checks whether the overall roof remains legible.
Reading a workshop roof: four useful observations
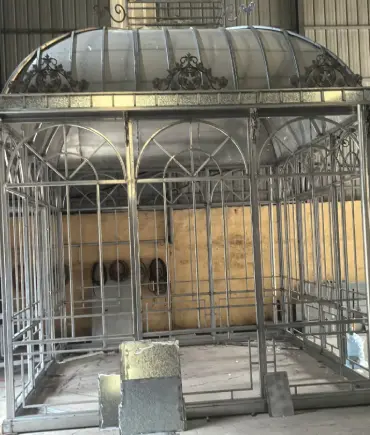
1. Follow the main outline
The silver-colored frame has a curved upper profile above a strong rectangular edge. Compare the rounded roof with the pitched white frame above. Choose the broad silhouette first; a change of color will not turn one geometry into the other.
2. Follow the roof divisions
Repeated ribs split the curve into narrower zones, with decorative elements visible near the lower part of the roof. Notice how the ribs meet the edge rather than looking only at the top crest. If a continuous sky view is important, ask for an interior view showing those same divisions.
3. Compare roof and wall rhythm
The wall bays combine straight uprights with arched divisions. That repetition gives the elevation order even when the roof is elaborate. A useful request is to keep the main wall bays calm while concentrating decoration at the roof edge—or to simplify both together.
4. Look at the visible edge and intersections
At the roof perimeter, ribs, trim and the wall frame come together. This is a good place to discuss how visible junctions will align, where the roof divides for transport, and which seams should follow an existing frame line. A joint schedule can connect that visual decision to the assembly drawings.
The photograph shows form and workshop fit-up. The roof section and project specification establish the covering, concealed fixings, seals, drainage and thermal construction. The photographs here are separate references; similar-looking frames are not presented as a documented before-and-after sequence.
Compare glass, shading and comfort as one roof decision
A bright roof photograph tells you little about how the room will feel on a particular afternoon. Compare the proposed glazing, frame and shade together, using the same opening size and project location.
| Information | What it tells you | How to use it |
|---|---|---|
| U-factor / U-value | Heat transfer through the rated product; lower means less heat transfer. | Check the units and whether the figure covers the glass alone or the complete unit. |
| Solar heat gain coefficient (SHGC) | The fraction of incoming solar energy admitted; lower means less solar heat gain. | Compare against the climate and intended use, alongside the shading proposal. |
| Visible transmittance (VT) | How much visible light the rated product transmits. | Compare daylight and view, rather than assuming a darker tint is automatically preferable. |
The U.S. Department of Energy explains these measures. The NFRC certification program provides independently verified product ratings. A rating for one component is not a rating for the complete custom garden room, and no certification is claimed here for the pictured frames.
Plan where the shade will go
Ask to see the intended blind or shade both deployed and retracted. Where does it meet the roof bars? Does the stored fabric cover part of the opening? Can you still reach vents and maintain the glass? This turns “include blinds” into a visible design choice. External shading and internal blinds are different proposals and should be compared with their actual product data.
Give ventilation an air path
A raised roof feature is not necessarily an opening vent. Identify actual opening panels, their controls and where replacement air enters. The DOE’s ventilation guidance explains how wind and a height difference between openings can support airflow; its cooling benefit depends on outdoor conditions. A hot, humid afternoon is a different brief from a cool evening. State the hours of use and whether mechanical conditioning is planned.
Keep condensation separate from rain leakage
Indoor moisture can condense on cold glazing or framing. Discuss interior humidity, the frame’s thermal design and the glazing edges as well as the glass. Plants, watering and occupancy belong in that conversation. The appearance of droplets alone does not locate a failed roof seal; investigating moisture and investigating rain entry are different tasks.
The roof edge is where the design becomes a building
Before selecting decorative trim, ask for a section showing the perimeter roof, glazed opening and their junction. Follow the intended rainwater route to its discharge point. Then locate the cleaning access. A handsome cornice should be considered alongside access to drains and the ability to maintain the glazing.
For an attached orangery, add the real wall connection to that section. Show existing openings, the roof junction and the proposed flashing interface. For a freestanding structure, show all roof edges and where water leaves the building. Neither arrangement should be resolved by copying an unrelated finished photograph.
Keep the scope explicit: roof covering, glazing, insulation, flashings, gutters, vents and blinds each need an identified supplier and installer. Yun can review the ornamental frame and design direction; the available roof system and supplied components are confirmed in the project proposal. Local professionals establish loads, supports, anchoring, approvals and the weatherproof building details. No standard glass thickness, span, wind rating or installation time follows from the examples here.
A short roof brief is enough to begin
- Use and location: dining, sitting or plants; destination and typical hours of use.
- Form: attached or freestanding, approximate footprint, height constraints and preferred roof arrangement.
- Two views: a roof reference you like and a site photograph; add a furniture sketch if available.
- Comfort priorities: overhead view, glare, shade, ventilation and seasonal heating/cooling expectations.
- Project team: who is preparing local drawings and who will install the roof and glazing.
For the surrounding frame and supply discussion, return to iron greenhouses and conservatories. If you are still choosing the type of garden structure, the orangery, conservatory and greenhouse comparison covers the broader terminology. The garden architecture cost guide is the related budget overview; compare the current proposal’s actual roof and delivery scope rather than applying a general price band to this design.
Orangery roof questions
Does an orangery have to have a roof lantern?
No single modern roof arrangement covers every historical use of the name. A solid perimeter with a lantern is a familiar current design, but describe the actual opaque roof and glazed opening when comparing proposals. See the roof-form comparison.
Is a larger lantern always better?
No. Compare its position over the furniture, the visible ceiling edge and the amount of framing. Glazing performance and shading matter alongside area. Use the two-plan example to separate position from size.
Can an existing conservatory take a different roof?
It requires an assessment of the existing structure, supports, proposed covering and connections. Treat a replacement as a project-specific design, rather than ordering a new roof from the old outside dimensions alone. This guide does not provide retrofit instructions.
Which is better: a glass or polycarbonate roof?
Compare the proposed complete systems: light and view, solar gain, insulation, sound, maintenance and structural suitability. The material name alone does not settle those questions. Polycarbonate is not listed here as a confirmed Yun supply option; request the actual system specification before comparing it with glass.